No doubt the old spinning hard drives are the main bottleneck of any Linux PC. Overall system responsiveness is highly dependent on storage drive performance.
So, here's how you can clone HDD to SSD without re-installing the existing Linux distro and now be clear about few things.
- As you're planning to move your existing linux installation to a SSD, there's a good chance that the SSD has smaller storage capacity(in GB) than the existing hard drive.
- You don't need to worry about the above, but you should clear up the existing hard drive as much as possible, I mean delete the junks.
- You should at least know what junks to exclude while copying the files, taking backup of important files is always good.
- Here we'll assume that it's not a dual boot system, only linux is installed on the hard drive.
- Read this tutorial carefully before actually cloning to SSD, anyway there's almost no risk of messing things up.
Of course it's not the only way to clone linux from HDD to SSD, rather it's exactly what I did after buying a SSD for my laptop.
This tutorial should work on every Linux distro with a little modification, depending on which distro you're using, I was using Ubuntu.
Contents
Hardware setup
As you're going to copy files from the hard drive to the SSD. So you need to attach the both disk at the same time on your PC/Laptop.
For desktops, it's easier, as there's always at least 2 SATA ports on the motherboard. You've just have to connect the SSD to any of the free SATA ports and you're done.

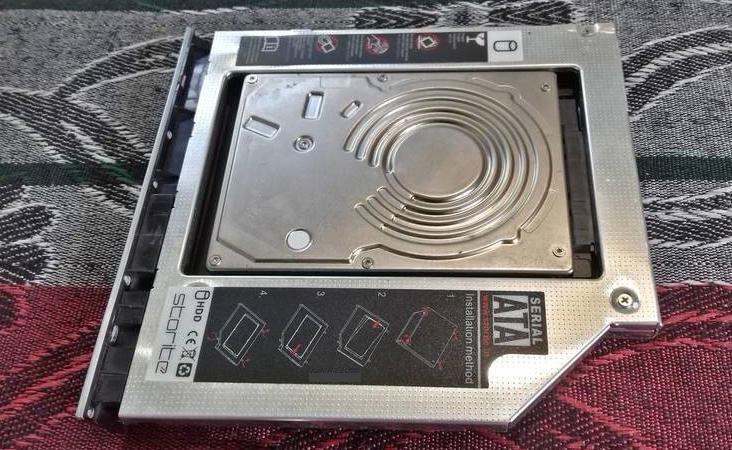
On laptops it's a bit tricky, as there's no free SATA port. If the laptop has a DVD drive, then you could remove it and use a "2nd hard drive caddy".
It could be either 9.5 mm or 12.7 mm. Open up your laptop's DVD drive and get a rough measurement.
But if you don't want to play around with your DVD drive or there's no DVD at all, use a USB to SATA adapter.
Preferably a USB 3 adapter for better speed, like this one. However the "caddy" is the best you can do with your laptop.
You'll need a bootable USB drive for letter steps, booting any live Linux distro of your choice, I used to Ubuntu.
You could use any method to create it, the dd approach will be the simplest. Here's detailed the tutorials, with MultiBootUSB and here's bootable USB with GRUB.
Create Partitions on the SSD
After successfully attaching the SSD, you need to partition it according to it's capacity and your choice. My SSD, SAMSUNG 850 EVO was absolutely blank, might be yours too as well. So, I had to create the partition table before creating disk partitions.
Now many question arises, likeWhat kind of partition table? How many partitions? Is there any need of a swap partition?
Well, if your Laptop/PC has a UEFI based BIOS, and want to use the UEFI functionalities, you should use the GPT partition table.

For a regular desktop use, 2 separate partitions are enough, a root partition and a home . But if you want to boot through UEFI, then you also need to crate a 100 MB or more FAT32 partition.
I think a 32 GB root partition is just enough, but you've to decide yours depending on future plans. However you can go with as low as 8 GB root partition, if you know what you're doing.
Of course you don't need a dedicated swap partition, at least what I think. If there's any need of swap in future, you can just create a swap file.

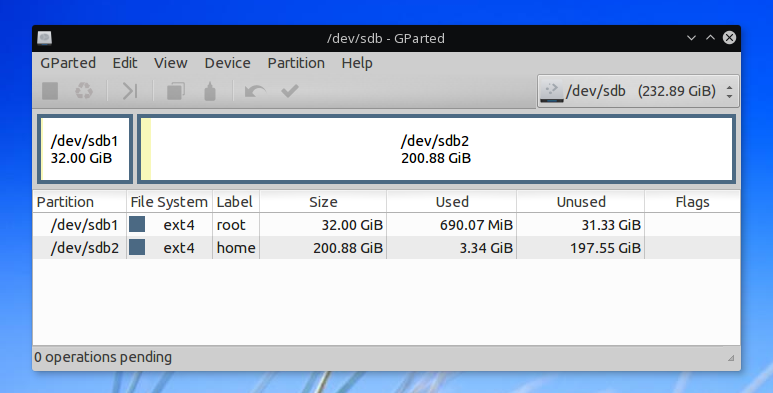
So, here's how I partitioned the disk. It's formatted with the MBR partition table, a 32 GB root partition and the rest of 256 GB(232.89 GiB) is home.
This SSD partitions were created with Gparted on the existing Linux system on the HDD. The SSD was connected to the DVD drive slot with a "Caddy", showing as /dev/sdb here.
Mount the HDD and SSD partitions
At the beginning of this step, you need to shutdown your PC and boot to any live Linux distro of your choice from a bootable USB drive.
The purpose of booting to a live linux session is for copying everything from the old root partition in a more cleaner way. I mean why copy unnecessary files or directories under /dev, /proc, /sys, /var , /tmp?
And of course you know how to boot from a USB drive, so I'm not going to repeat the same thing. After booting to the live session, you've to mount both the HDD and SSD.
As I used Ubuntu live, so just opened up the file manager to mount the volumes. At this point you've to be absolutely sure about which are the old and new root and home partitions.
And if you didn't had any separate /home partition on the HDD previously, then you've to be careful while copying files. As there could be lots of contents that won't fit inside the tiny root volume of the SSD in this case.
Finally if you don't want to use any graphical tool like file managers to mount the disk partition, then it's even better. An example below, only commands, not much explanation.
sudo -i    # after booting to the live session

mkdir -p /mnt/{root1,root2,home1,home2}       # Create the directories

mount /dev/sdb1 /mnt/root1/       # mount the root partitions
mount /dev/sdc1 /mnt/root2/

mount /dev/sdb2 /mnt/home1/       # mount the home partitions
mount /dev/sdc2 /mnt/home2/
Copy contents from the HDD to SSD
In this step, we'll be using the rsync command to clone HDD to SSD while preserving proper file permissions. And we'll assume that the all partitions are mounter like below.
- Old root partition of the hard drive mounted on
/media/ubuntu/root/ - Old home partition of the hard drive on
/media/ubuntu/home/ - New root partition of the SSD, on
/media/ubuntu/root1/ - New home partition of the SSD mounted on
/media/ubuntu/home1/
Actually in my case, both the root and home partitions were labelled as root and home, so udisk2 created the mount directories like above.
Note: Most probably your mount points are different. Don't just copy paste the commands below, modify them according to your system and requirements.
First copy the contents of one root partition to another.
rsync -axHAWXS --numeric-ids --info=progress2 /media/ubuntu/root/ /media/ubuntu/root1/
You can also see the transfer progress, that's helpful.
The copying process will take about 10 minutes or so to complete, depending on the size of it's contents.
Note: If there was no separate home partition on your previous installation and there's not enough space in the SSD's root partition, exclude the /home directory.
For that, we'll use the rsync command again.
rsync -axHAWXS --numeric-ids --info=progress2 --exclude={/home} /media/ubuntu/root/ /media/ubuntu/root1/
Now copy the contents of one home partition to another, and this is a bit tricky of your SSD is smaller in size than the HDD. You've to use the --exclude flag with rsync to exclude certain large files or folders.
So, here for an example, I wanted to exclude few excessively large folders.
rsync -axHAWXS --numeric-ids --info=progress2 --exclude={home/b00m/OS,home/b00m/Downloads} /media/ubuntu/home/ /media/ubuntu/home1/
Excluding files and folders with rsync is bit sketchy, the source folder is the starting point of any file or directory path. Make sure that the exclude path is properly implemented.
Note: You need to go through the below step only if you excluded the /home directory while cloning to SSD, as said above.
rsync -axHAWXS --numeric-ids --info=progress2 /media/ubuntu/root/home/ /media/ubuntu/home1/
Hope you've got the point, for a proper HDD to SSD cloning in linux, copy the contents of the HDD's root partition to the new SSD's root partition. And do the the same thing for the home partition too.
Install the bootloader on the new SSD/NVMe
The SSD won't boot until there's a properly configured bootloader. And there's a very good chance that you'were using GRUB as a boot loader.
So, to install GRUB, we've to chroot on the root partition of the SSD and install it from there. Before that be sure about which device under the /dev directory is your SSD. In my case, it was /dev/sdb.
Note: You can just copy the first 512 byte from the HDD and dump it to the SSD, but I'm not going that way this time.
So, first step is chrooting, here's all the commands below, running all of then as super user.
sudo -i               # login as super user

mount -o bind /dev/ /media/ubuntu/root1/dev/
mount -o bind /dev/pts/ /media/ubuntu/root1/dev/pts/
mount -o bind /sys/ /media/ubuntu/root1/sys/
mount -o bind /proc/ /media/ubuntu/root1/proc/

chroot /media/ubuntu/root1/
After successfully chrooting to the SSD's root partition, install GRUB. And there's also a catch, if you want to use a UEFI compatible GRUB, then it's another long path. But we'll be installing the legacy BIOS version of the GRUB here.
grub-install /dev/sdb --boot-directory=/boot/ --target=i386-pc
If GRUB is installed without any problem, then update the configuration file.
update-grub
These two commands above are to be run inside the chroot, and don't exit from the chroot now. Here's the detailed GRUB rescue tutorial, both for legacy BIOS and UEFI systems.
On UEFI supported systems, you can boot in many different ways, in some cases you don't even need a bootloader!
Recently most Linux kernels are compiled with the CONFIG_EFI_STUB=y option, so the kernel is also a valid UEFI executable. So you can boot Linux without GRUB or any other bootloader.
In that case copy the kernel, initrd/initramfs file and any microcode if needed then create a proper UEFI boot entry and you're done.
Or alternatively you can make a UKI , unified kernel image which contains the kernel, initramfs, microcode, and kernel command line in a single file which is also a valid UEFI executable, can be booted directly on a UEFI system, just a single file!
One major advantage of directly booting the kernel or a UKI is super fast boot speed, just look how fast the kernel and bootloader loaded in this example. It's directly booting a custom 6.18.x kernel on a 12th gen intel system.

Update the fstab entry
You've to properly update the fstab entry to properly mount the filesystems while booting.

Use the blkid command to know the proper UUID of the partitions.
Now open up the /etc/fstab file with your favorite text editor and add the proper root and home UUID at proper locations.
nano /etc/fstab

The above is the final fstab entry from my laptops Ubuntu installation.
Shutdown and boot from the SSD
If you were using a USB to SATA converter to do all the above steps, then it's time to connect the SSD to a SATA port.
For desktops it's not a problem, just connect the SSD to any of it's available SATA port. But many laptop refuses to boot if the DVD drive is replaced with a SSD or HDD. So, in that case, remove the hard drive and slip the SSD in it's place.
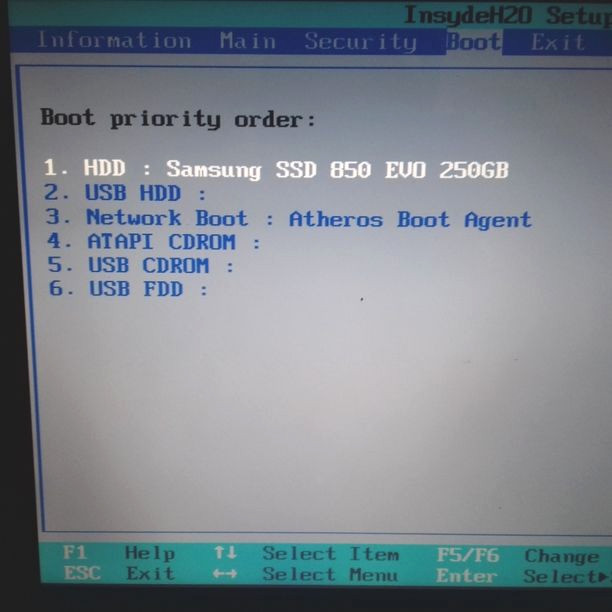
After doing all the hardware stuff, it's better to check if the SSD is recognized by the BIOS/UEFI at all. Hit the BIOS setup button while powering it up, and check all the disks.

If the SSD is detected, then set it as the default boot device. Save all the changes to BIOS/UEFI and hit the power button again.
Now it's the moment of truth, if HDD to SSD cloning was done right, then Linux should boot. It will boot much faster than previous, you can check that with the systemd-analyze command.
Conclusion
It's basically figuring out relevant files and copying them properly to the new SSD/NVMe, then and installing the bootloader on new drive, and finally boot from the new drive.
As said before it's neither the only way nor the perfect, but was pretty simple for me.I got the idea from openwrt extroot setup, but previously used the squashfs tools instead of rsync.
It took around 20 minute to clone my HDD to SSD. But, well writing this tutorial took around 15X more time of that.
Hope I'll be able to add the GRUB installation process for UEFI based systems to this tutorial soon, stay tuned !
Also please don't forget to share your thoughts and suggestions on the comment section.
Excelent tutorial, many thanks!.
Cloned my ubuntu EFI system from a 8TB hd to a 4TB ssd excluding one big directory without any issues. Well, somehow I had to change in the exclude option for rsync from --exclude={pathPartToExclude} to --exclude='pathPartToExclude'
For the EFI part, I followed the second Comment.
Hello,
It seems you haven't gotten around writing that UEFI based article yet. But right now I really need the steps necessary to clone hdd to ssd in UEFI based system. Can you please let me know how to do it?
Create an extra UEFI partition, along with root and home partitions, FAT32, 100 to 200 MB, install GRUB in UEFI mode, it should boot.
Commands should be like this -
mount /dev/sda2 /boot/efi

grub-install /dev/sda --target=x86_64-efi
sda2 is the EFI partition.
This could be helpful- https://www.pcsuggest.com/grub-rescue-linux/#GRUB_rescue_on_UEFI_systems
Then edit the grub.cfg file under /boot/grub/ , you're good to go.
If it's not booting try GRUB rescue, boot and install grub from there.
I'm already using Kubuntu 20.04, and now I'm trying to add an SSD to my laptop. It is running windows alongside. I want the data to be there but instead of using HDD, the Kubuntu OS should use SSD. How to do it?
Can you explain what to do if the original HDD has Swap and you don't want it on the SSD?
Thanks.
You can ignore the Swap partition, as it's not essential for booting.
Edit the /etc/fstab file, and use a swap file instead.
A couple of problems:
In one section you mount homeS and rootS as root1 root2 home1 home2 but in the next sectionS you call them root root1 home home1
In the blkid image sda is SSD and sdb is HDD but you said in the previous paragraph that sdb is your SSD
Thanks for the guide
The first portion is just an example, not the actual commands.
There's some confusing paragraphs and formatting error, I agree.
Thank you very much for the article
Yesterday moved linux from hdd to ssd without any problem
Brilliant article
hey, I'm trying to move Linux from HDD to SSD with windows as a dual boot option.
What changes should I do?
Thank you for your article. It was very helpful. But i see one disadvantage. When you copy like cp -a /media/ubuntu/root/ /media/ubuntu/root1/ In root1 will be created root folder, but not all its content separately without folder. To avoid this you must add (*) after /
It should be looked like cp -a /media/ubuntu/root/* /media/ubuntu/root1/ For my opinion rsync command is much more better. You see like files copping. And when i used cp, i did not understand the process hanged up or not.
Thanks for pointing out the typo.
Yeas, rsync is better.
Just a quick note: rsync, scp, cp etc. all seem to have a file size limitation of approximately 100GB. So this tutorial will work well with the average filesystem, but will bomb repeatedly if the file size is extremely large.
Question: If one doesn't need to exclude anything why not use "cp -a" instead of rsync?
Question: You say "use a UEFI compatible GRUB, then it's another long path" but you don't tell us how to do this for UEFI. How do we do it?
1. Yeah, using
cp -ais preferable if we don't have to exclude anything.2. At the moment of writing, I didn't had any PC/laptop with a UEFI firmware.
Thanks for the feedback, fixed the first issue.
best tutorial ever, thank you!
You're most welcome, truly I don't know how to respond such a praise. Thanks!
Far the best tutorial I've found "quickly" searching DuckDuckGo. Planning to migrate my system on early 2018. Thank you! I now visualize quite clearly the different steps I'll have to adapt and pass through. it also stick to the KISS* thank you again, the time you invested is very useful, at least for me!
Best regards.
Emmanuel
Wow! That's motivating, thanks Emmanuel.